Remote-Programing

Programming Mode

How to program a single or a four channel hand held remote

Before you begin

Motors are shipped without the up and down stop limit set.
Steps 1 to 7 must be completed to ensure proper shutter programming and functionality. Power should ONLY be connected to current shutter being programmed.

Please note: While programming, the shutter should not be inactive for longer than 2 minutes or motor will exit PROGRAMMING MODE.

Please note: If the shutter height limit is not set correctly, the bottom bar of the curtain has a bottom bar V stopper each side, which stops the curtain from going completely into the head box, but this causes the motor to jam and stop, this should be avoided and the up limit set to stop the curtain before this happens.

Please note: The Box Locking System must be set at the correct position. Please read
The Box Locking System and the Slat locking System

Step 1

Connect only the shutter being programmed to the power. When programming a multi channel remote select the required channel.
Shutter13

Step 2

Initiate Programming Mode.

On the hand held remote press and hold both Up and Down simultaneously until the shutter jogs. A jog is a brief up and down motion of the shutter’s curtain. In Programming Mode. The shutter will move only when the Up or Down is held.
Shutter13

Step 3

Check direction

Press and hold Up or Down when pressing Down the shutter should go down, when pressing Up the should go up.

Shutter moves in the wrong direction

To change direction press and hold (Stop) until the shutter jogs, & the direction is reversed. This could take up to 5 seconds.

Shutter13

Step 4

Set the Up limit

Bring the shutter to desired upper limit stop point. You can adjust by this position by pressing Up  or Down

Press and hold both  (Stop) and Down simultaneously until the motor moves, then release.

(If the shutter stops when the buttons are released take it back to the upper limit and repeat)

Please note: In case of problems with setting of limits during PROGRAMMING MODE, turn the power off to the motor for 2 seconds and then back on to reset the motor. Please return to INITIARE PROGRAMMING MODE to initiate programming process.

Shutter13

Step 5

Set down limit
Stop the motor when reaching the correct lower limit, as described in the box locking system.

The Box Locking System and the Slat locking System

You can adjust by pressing Up or Down to get the correct position.

Press and hold both (Stop) and Up simultaneously
until the shutter moves, then release.

Please note: In case of problems with setting of limits during PROGRAMMING MODE, turn the power off to the motor for 2 seconds and then back on to reset the motor. Please return to INITIARE PROGRAMMING MODE to initiate programming process.

Please note: To clear a PROGRAMED CHANNEL, turn the power off to the motor for 2 seconds, then turn the power on to the motor for 10 seconds, then turn the power off to the motor for 2 seconds, now put the power back on.
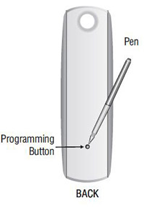
Then with the hand held remote hold the PROGRAMMING BUTTON for 10 seconds, the shutter will move and stop, then the channel will be cleared, ready for reprogramming.

Shutter13

Step 6

Confirm Limit setting
Press and hold (stop) until the shutter jogs to confirm the limit settings.

A jog is a brief up and down motion of the shutter’s curtain.

shutter14

Step 7

To Complete Programming
Press and hold the programming button on the back of the transmitter until the shutter jogs. The shutter is now in user mode.

User Mode.

In User Mode, the shutter will operate with a brief press on Up or Down 

Double check limit settings as a precaution.

Programming more than one shutter

You can now connect the next shutter to the power, and repeat the above process until all your shutters are programmed.

Adjusting the Limits in User Mode

Step 1

Press Down to send the shutter to it’s current LOWER Limit

Step 2

Press and hold both Up and Down  simultaneously until the shutter jogs. Adjust to a new LOWER limit position.

STEP 3:

Press and hold (stop) until the shutter jogs, to confirm new limit.

To Change the Upper Limit:

STEP 1:

Press Up to send the shutter to it’s current UPPER Limit.

STEP 2:

Press and hold both Up and Down  simultaneously until the shutter jogs. Adjust to a new UPPER limit position.

STEP 3:

Press and hold (STOP) until the shutter jogs, to confirm new limit.

How to program all 4 channels

After you have programmed all your shutters individually (with the help from the information above) you are now ready to program all 4 channels, this will allow you to operate all your shutter at the same time.

Step 1

Select channel 1 then press the program button on the back of the hand held remote for 5 seconds, the motor will move, then press the channel button on the front of the hand held remote until all four lights are illuminated, then press the programming button on the rear of the hand held remote for half a second, the motor will move, you have now programmed the first channel to channel 5. Repeat this process with the remaining channels, after this process all shutters will open and close at the same time when channel 5 is selected.

How to add multiple remotes to your automated roller shutter

STEP 1

Using a paperclip or pen, press and hold the PROGRAM BUTTON on the remote that has been programmed until the curtain jogs.

STEP 2

Using a paperclip or pen, press and hold the PROGRAM BUTTON on the NEW REMOTE until the curtain jogs. The NEW REMOTE is now configured, and can be used to operate your roller shutters.