
How to install: Manual Hand-Wind Roller Shutters
This article will teach you how to install a manual hand winder for your OZRoll Roller Shutter. If you’re looking to buy a new roller shutter winder box or order a replacement, browse our range of roller shutter parts here.
Manual installation is the most difficult installation
Manual strap control, or Manual Hand Wind control. The maximum size for a Manual strap control is 1.8 square meters. The maximum size for a Manual Hand Wind control is 5 square meters. The size of your shutter will determine which control will be fitted when manufactured.
Tools required:
- Spirit level.
- Hammer drill.
- 5mm drill bit, Steel.
- 10mm drill bit, Steel.
- Hammer.
- Rivet gun
- Pliers.
- Strap access hole for solid brick homes, 6mm, 12mm, 17mm, 22mm, and 25mm Masonry drill bits.
- Strap access hole for timber framed homes 25mm Spade bit.
- 6 or 8mm Masonry drill bit depending on wall plug size chosen, and Stainless Steel screws to suit. For timber frame windows, just Stainless Steel screws.
- Manual components: 1 head box, 2 guides, 2 guide legs, 10mm coloured guide plugs, rivets, and the roller shutter winder box control kit.
In-Reveal This type of installation is only suitable for homes with a double wall and cavity, construction.
Step 1.
Mark the bottom horizontal position of the head box, on the drive side of the wall, this will be 50mm below the lintel, this point will also be the top of the guide, from this point level across to the other side wall. On this line mark the width of the shutter, and the top of the guide position. From these 2 marks, vertically level down each side of the window. You will now have the outline of the roller shutter marked on the wall. At this stage you can check that it is central to the window and is exactly horizontal and vertical — This Is Most Important!
In-Reveal is the same principle but your window is your horizontal and vertical position. From the lintel measure down the thickness of the head box, and 40mm in from the window frame, on each side, and make sure this is exactly horizontal, if not make adjustments so this is horizontal. From this point to the sill will be the length of the guide. Still check that they are exactly horizontal and vertical. This Is Most Important The guides can now be cut to length, and correct angle of the sill.
Step 2.
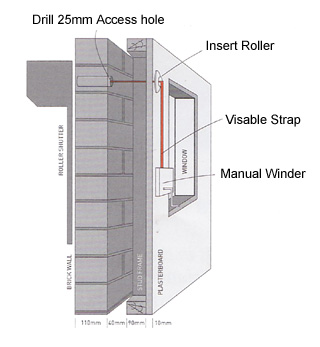
On the drive side of your roller shutter, measure up 15mm from the top of the guide position, marked on the wall, and 15mm in from the out side of the head box position, this will give you the centre position of the 25mm access hole.
Drill a 6mm pilot hole straight through into the house, taking care to slow down before drilling through the other side.
Then use a 12mm, then a 17mm, then a 22mm drill bit to increase the hole size without damaging the brick or plaster. Then from the inside of the room drill back with the 25mm drill bit, half way. Then from the out side finish with the 25mm drill bit to complete the hole, this will limit the damage to the plaster.
For In-Reveal From the bottom of the head box measure up 5mm, then 55mm up from the bottom of the head box, then 40mm in from the window frame and remove that section of brick, this hole will be covered by the side entry cover plate.
From inside the room, you will now need to drill the 25mm access hole. From the centre of the out side entre hole, and 50mm in from the window frame, this will be the centre of the 25mm access hole.
Step 3.
Cut the insert tube to the length of the 25mm access hole. The flush fit slotted tape guide, can now be inserted into the insert tube, and pushed into the 25mm access hole, if the tube is a loose fit, put some electrical tape around the tube to stop it from turning.
Step 4.
Hold the guide in the 2 positions marked, on the drive side of your window. Top of guide position (as in step 1) and the vertical guide position.
You can now mark the best position to fix the guide to the wall and these marks can be transferred to the other side guide.
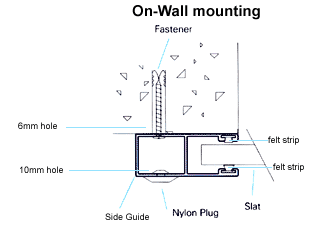
You can now drill through the front and back of the guide; the drill size is determined by the size of Stainless Steel screw you use. The front of the guide will need a 10mm hole in which the 10mm coloured guide plugs are inserted – this then covers up the fixing points.
Step 5
With the pre drilled guide, you can now mark the positions for the fixing holes, to be drilled in the wall.
Then drill and plug the wall if masonry; if it is a timber wall, just a pilot hole to suit the fixing screws.
You can now fix the guide on the drive side of your shutter to the wall, at the bottom and middle fixing points only.
The other side guide can now be fitted. First check with a level that the top position, of the opposite guide, is correct, and parallel to the fitted guide. Only use the fixing points at the bottom and middle of the guide, this will allow some movement when fitting the head box.
For In-Reveal:
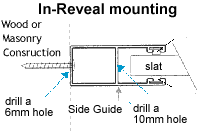
The fixing holes are drilled from the curtain side 10mm to the outside 5mm. No 10mm coloured plug is required.
Step 6.
Remove the head box cover, which comes with pre-drilled holes, to attach to the head box after installation. Remove the green rubber rings that holds the box end inserts in position, when in transport, and slide the guide legs into position, make sure they are in tight with a pair of pliers. Remove the protective plastic cover from the outer head box.
Step 7.
You can now lift the head box. into position, and slide it evenly down into the guides.
Once the head box. is down flush with the top of the guides, the two remaining screw that fix the top of the guides to the wall, can now be inserted.
With the control strap you can now fully unwind all of the control tape on the spool. Then wind two full rotations of control strap back onto the spool.
For In-Reveal:
With the guides attached to the head box, and no twists in the control tape, feed the control tape through the back of the head box, and into the side enter slotted tape guide, and through the tube insert into the room. Then fix the guides to the wall.
Step 8.
Keep pressure on the control tape at all time, to stop the shutter from fully unwinding, and carefully unwrap the curtain and place the bottom bar of the curtain into the guides, on each side, they will click into position. Then with the control tape lower the curtain down to the sill.
Step 9.
With the control strap you can now fully unwind all of the control tape on the spool. Then wind two full rotations of control strap back onto the spool. With no twists in the control tape, feed the control tape through the back of the head box, and into the flush fitted slotted tape guide, and through the tube insert into the room.
Remove the Plastic Protective Cover, from each end of the head box cover, and rivet the cover on, you can now remove the rest of the protective plastic cover.
On-Wall Installation: Then insert the 10mm coloured guide plugs.
Step 10.
From inside the room.
With no twists in the control tape, feed the control tape through the Diamond roller, then fix the Diamond roller to the wall.
Mark the position of the winder control’s fixing points, on the desired position, on the wall, then cut the control strap 500mm longer than the winder controls position, marked on the wall.
Separate the winder control, by removing the two holding screw, and remove the rollers and the spool, slide the rollers onto the strap, then feed the strap into the slot in the centre of the spool, and secure it with a firm knot.
With no twists in the control tape, wind the excess control tape on to the spool, then position the rollers back into the winder control, with the winder spool. Place the winder control’s cover back on, with the two holding screws.
Step 11.
The winder control can now be fixed to the to the fixing point previously marked on the wall in step 10. For gyprock walls use self-drilling plasterboard anchors.
Your shutter is now fully installed.
Please note: install with no window sill
Although 90% of windows have sills, if your windows don’t, then don’t despair! We have a solution to that.
We can supply a false sill, which is required for the curtain to fully close down on.
24mm x 22mm $6.00
24mm x 46mm $8.50
24mm x 77mm $11.00.